The Ultimate Homemade Stuffing Recipe – Rich, Fluffy, and Full of Flavor
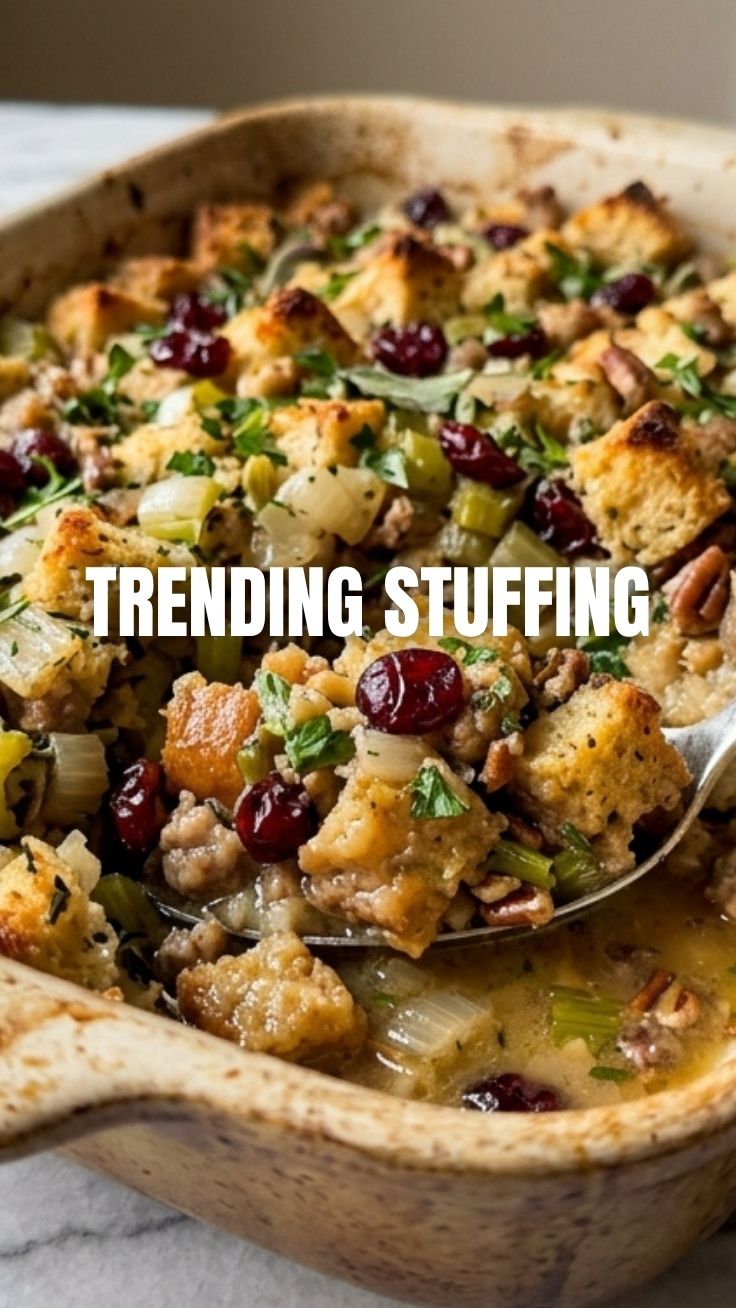
Ever wondered why restaurant-style Stuffing tastes so much better than the boxed version? The secret lies in fresh ingredients, careful seasoning, and a touch of patience. Preparing this classic side dish at home not only elevates your holiday table but also lets you control the texture – from a crunchy top to a moist, plush interior. Whether you’re hosting Thanksgiving, Christmas, or a cozy Sunday roast, mastering homemade stuffing gives you a versatile, crowd-pleasing recipe that pairs perfectly with turkey, chicken, or even roasted vegetables. Let’s dive into the details and make your next meal unforgettable.
—
Ingredients & Kitchen Tools
Essential Ingredients:
– 1 loaf (about 1 lb) day-old sourdough or French bread – sturdy enough to hold shape without turning mushy.
– ½ cup unsalted butter – adds richness; substitute with olive oil for dairy-free.
– 1 large onion, diced (about 1½ cups) – sweet yellow or white onion works best.
– 3 celery stalks, diced – for classic crunch and aroma.
– 3 garlic cloves, minced – optional but recommended for depth.
– 2 teaspoons fresh sage, chopped (or 1 tsp dried) – the star herb.
– 1 teaspoon fresh thyme leaves (or ½ tsp dried).
– ½ teaspoon fresh rosemary, minced (optional).
– 2 cups low-sodium chicken or vegetable broth – adjust for desired moisture.
– 2 large eggs, beaten – binds the stuffing; omit for vegan version.
– Salt and black pepper to taste.
– ¼ cup fresh parsley, chopped – for garnish.
Kitchen Tools:
– Large skillet or sauté pan
– 9×13-inch baking dish (or similar)
– Chef’s knife & cutting board
– Mixing bowls (large and medium)
– Wooden spoon or spatula
– Measuring cups and spoons
Optional Substitutions:
– Replace bread with gluten-free bread cubes.
– Use vegetable broth and vegan butter for dairy-free/vegan.
– Add dried cranberries, toasted nuts (walnuts/pecans), or cooked sausage for variation.
—
Prep Time & Cooking Schedule
– Prep Time: 20 minutes (chopping, cubing bread, measuring ingredients)
– Cook Time: 35–40 minutes at 375°F (190°C)
– Resting Time: 5 minutes after baking (allows flavors to settle)
– Optional Overnight Tip: Prepare the stuffing mixture the night before, cover, and refrigerate. Add 10 extra minutes to baking time if starting from cold.
Plan ahead: If using fresh bread, cube it and leave it uncovered on a baking sheet overnight to dry out. This prevents a soggy result.
—
Step-by-Step Instructions
1. Preheat oven to 375°F (190°C). Grease a 9×13-inch baking dish.
2. Prepare the bread: Cut the day-old bread into ¾-inch cubes. Spread on a baking sheet and toast for 10–12 minutes until lightly golden. This creates a crispier edge while keeping the center soft.
3. Sauté aromatics: In a large skillet, melt butter over medium heat. Add onion, celery, and a pinch of salt. Cook until softened (about 6 minutes). Add garlic, sage, thyme, and rosemary; cook 1 minute more.
4. Combine base: Transfer the toasted bread cubes to a large bowl. Pour the sautéed vegetables over the bread and toss gently.
5. Add liquid: In a medium bowl, whisk together broth and beaten eggs. Pour over the bread mixture, stirring until evenly moistened. The bread should be moist but not swimming – add extra broth a tablespoon at a time if needed. This stage defines the ultimate stuffing texture: light yet cohesive.
6. Season and rest: Season with ½ teaspoon black pepper and ¾ teaspoon salt (adjust to your broth’s saltiness). Let the mixture sit for 5 minutes so the bread absorbs the liquid.
7. Transfer to dish: Spoon into the prepared baking dish. Gently press down to an even thickness. For extra crunch, dot the top with 1 tablespoon of melted butter.
8. Bake: Cover with foil and bake for 25 minutes. Remove foil and bake another 10–15 minutes until the top is golden brown and slightly crisp. The interior should remain tender and plush – like a savory cloud.
9. Rest and serve: Let stand 5 minutes before serving. Garnish with fresh parsley.
—
Nutritional Benefits & Advantages
Homemade stuffing offers several health perks over store-bought mixes, which often contain high sodium and preservatives. By using whole-grain or sourdough bread, you add fiber and gut-friendly prebiotics. Celery provides vitamin K and antioxidants, while fresh herbs like sage deliver anti-inflammatory compounds. The butter adds vitamin A, but you can reduce fat by using half olive oil. This dish also freezes well, making it an excellent make-ahead side. Plus, controlling salt levels helps those managing blood pressure.
—
Tips, Variations & Cooking Advice
– Flavor twist: Swap sage for tarragon and add chopped apples for a sweet-savory version.
– Gluten-free: Use certified gluten-free bread and ensure broth is gluten-free.
– Extra crunch: Add ½ cup toasted pecans or walnuts in the last 5 minutes of baking.
– Slow cooker method: Prepare mixture, place in greased slow cooker, cook on low for 3–4 hours, then uncover last 30 minutes for crisp top.
– Dietary adaptations: Skip eggs and use ¼ cup olive oil or applesauce as binder for vegan stuffing. Increase broth slightly if needed.
—
Common Mistakes to Avoid
– Soggy stuffing: Using fresh, soft bread without drying it out leads to mushiness. Always dry cubed bread in the oven or leave it out overnight.
– Underseasoning: Bread absorbs salt, so taste the mixture before baking. A well-seasoned stuffing makes all the difference.
– Overmixing: Stirring too aggressively breaks down bread cubes into paste. Use a gentle folding motion.
– Baking too dry: Cover with foil for most of the cooking time to trap steam; uncover only at the end for browning.
—
Storage & Meal Prep Tips
– Refrigeration: Store leftover stuffing in an airtight container for up to 4 days.
– Freezing: Portion into freezer-safe bags or containers. Freeze for up to 3 months. Thaw overnight in the fridge.
– Reheating: For crisp edges, reheat in a 350°F oven, uncovered, for 15–20 minutes. Add a splash of broth if it seems dry. Microwave on medium power for 2–3 minutes for a quicker option (texture will be softer).
– Meal prep: Cube and toast bread up to 3 days ahead. Sauté vegetables and store separately. Combine on baking day.
—
Conclusion
Making homemade stuffing from scratch is easier than you think and delivers a dish that is both comforting and impressive. With its golden crust and plush interior, this recipe becomes the heart of any holiday spread. Once you taste the freshness of herbs and the perfect balance of savory and soft, you’ll never go back to the boxed version. Try this recipe for your next gathering, share your results in the comments, and explore our other side dish ideas like roasted root vegetables and creamy mashed potatoes. Happy cooking!
—
FAQs
1. Can I make stuffing without eggs?
Yes. Substitute ¼ cup unsweetened applesauce, 2 tablespoons flaxseed meal mixed with 6 tablespoons water, or simply omit the eggs and increase broth slightly. The texture will be a little looser but still delicious.
2. How do I prevent stuffing from being too dry?
Ensure the bread cubes are evenly moistened before baking. Use enough broth so the bread feels damp but not saturated. Covering the dish for most of the baking time traps steam.
3. Can I prepare stuffing in advance?
Absolutely. Assemble the uncooked stuffing in the baking dish, cover, and refrigerate for up to 24 hours. Add 10–15 minutes to the baking time when cooking from cold.
4. What’s the best bread for stuffing?
Day-old sourdough, French baguette, or brioche (for a richer taste). Avoid fluffy sandwich bread, which turns mushy.
5. How do I add more flavor?
Sauté mushrooms with the onions, stir in ½ cup dried cranberries, or add crumbled cooked sausage. A splash of white wine or a tablespoon of Dijon mustard also boosts depth.
How to grow Stuffing in 7 days
Ingredients
Equipment
Method
- Fill a small pot with potting soil and make a small hole in the center.
- Carefully place one "stuffing seed" into the hole and cover it with a thin layer of soil.
- Water the soil gently, ensuring it is moist but not waterlogged.
- Place the pot in a sunny spot and wait patiently for seven days.
- On the seventh day, observe your pot for any signs of "stuffing sprouts."
- Since stuffing cannot actually be grown, enjoy the humor in this culinary experiment and perhaps order some real stuffing instead.