The Ultimate Guide to Perfect Hot Honey Chicken at Home
Have you ever craved that irresistible balance of sweet heat that restaurant-style chicken delivers, only to find yourself stuck with a takeout menu that never quite satisfies? Today, we are going to change that. Preparing Hot Honey Chicken in your own kitchen is not just rewarding—it is a game-changer for your weeknight dinner rotation. You gain full control over the heat level, the quality of the oil, and the freshness of every ingredient. Forget the delivery fees and soggy textures; this homecooked version delivers a crunch that stays crisp and a glaze that clings perfectly to every piece. The secret lies in mastering a few simple techniques that professional chefs use every day. Let us dive into why this sticky, spicy, and undeniably delicious dish deserves a permanent spot on your table.
Ingredients & Kitchen Tools
Before you start, gather these essentials to ensure a seamless cooking experience.
For the Chicken:
– 2 lbs boneless, skinless chicken thighs (or breasts; thighs stay juicier)
– 1 cup buttermilk (helps tenderize and creates a base for the breading to stick)
– 1½ cups all-purpose flour
– ½ cup cornstarch (key for extra crunch)
– 1 tablespoon paprika
– 1 teaspoon garlic powder
– 1 teaspoon cayenne pepper (adjust for heat preference)
– Salt and black pepper to taste
– Oil for frying (neutral oil like canola or peanut works best)
For the Hot Honey Glaze:
– ½ cup honey
– 2 tablespoons hot sauce (such as Frank’s RedHot or sriracha)
– 1 tablespoon apple cider vinegar
– ½ teaspoon red pepper flakes (optional, for more heat)
– 1 tablespoon unsalted butter (adds richness and shine)
Kitchen Tools:
– Large mixing bowls
– Whisk
– Deep skillet or Dutch oven for frying
– Meat thermometer (for oil temperature)
– Wire rack set over a baking sheet
– Tongs
– Small saucepan for glaze
Optional Swaps: Use gluten-free flour blend for GF version; coconut aminos can replace vinegar for a different acid profile.
Prep Time & Cooking Schedule

| Stage | Time | Notes |
|——-|——|——-|
| Prep | 15 minutes | Cut chicken, mix dry ingredients, whisk buttermilk |
| Marinate | 30 minutes (minimum) | Let chicken sit in buttermilk for tenderness |
| Fry | 12–15 minutes | Cook in batches at 350°F for golden crunch |
| Glaze | 5 minutes | Simmer sauce while chicken rests |
| Rest | 5 minutes | Drain on wire rack, then toss in glaze |
Plan ahead: Marinate the chicken while you prep your work station. This schedule keeps everything running smoothly without last-minute chaos.
Step-by-Step Instructions
1. Prepare the chicken: Cut thighs into bite-sized pieces (about 2-inch chunks). Season lightly with salt and pepper. Place in a bowl with buttermilk, ensuring all pieces are coated. Cover and refrigerate for at least 30 minutes. This step is non-negotiable for tender, juicy meat.
2. Build the breading station: In a shallow dish, whisk together flour, cornstarch, paprika, garlic powder, cayenne, 1 teaspoon salt, and ½ teaspoon black pepper. Remove chicken from buttermilk, letting excess drip off. Dredge each piece in the flour mixture, pressing firmly to adhere. Shake off excess and place on a wire rack. Let rest 5 minutes—this helps the coating adhere better during frying.
3. Fry to perfection: Heat 2 inches of oil in a deep skillet to 350°F (use a thermometer). Working in batches to avoid overcrowding, fry chicken pieces for 5–7 minutes, turning occasionally, until deep golden brown and internal temperature reaches 165°F. Transfer to a clean wire rack (not paper towels—paper makes the crust soggy). For the ultimate crispy Hot Honey Chicken, maintain oil temperature between 340°F and 360°F throughout.
4. Make the glaze: While chicken rests, combine honey, hot sauce, vinegar, and red pepper flakes in a small saucepan. Bring to a gentle simmer over medium heat, stirring frequently. Remove from heat and whisk in butter until melted and glossy. Taste and adjust: more honey for sweetness, extra hot sauce for heat.
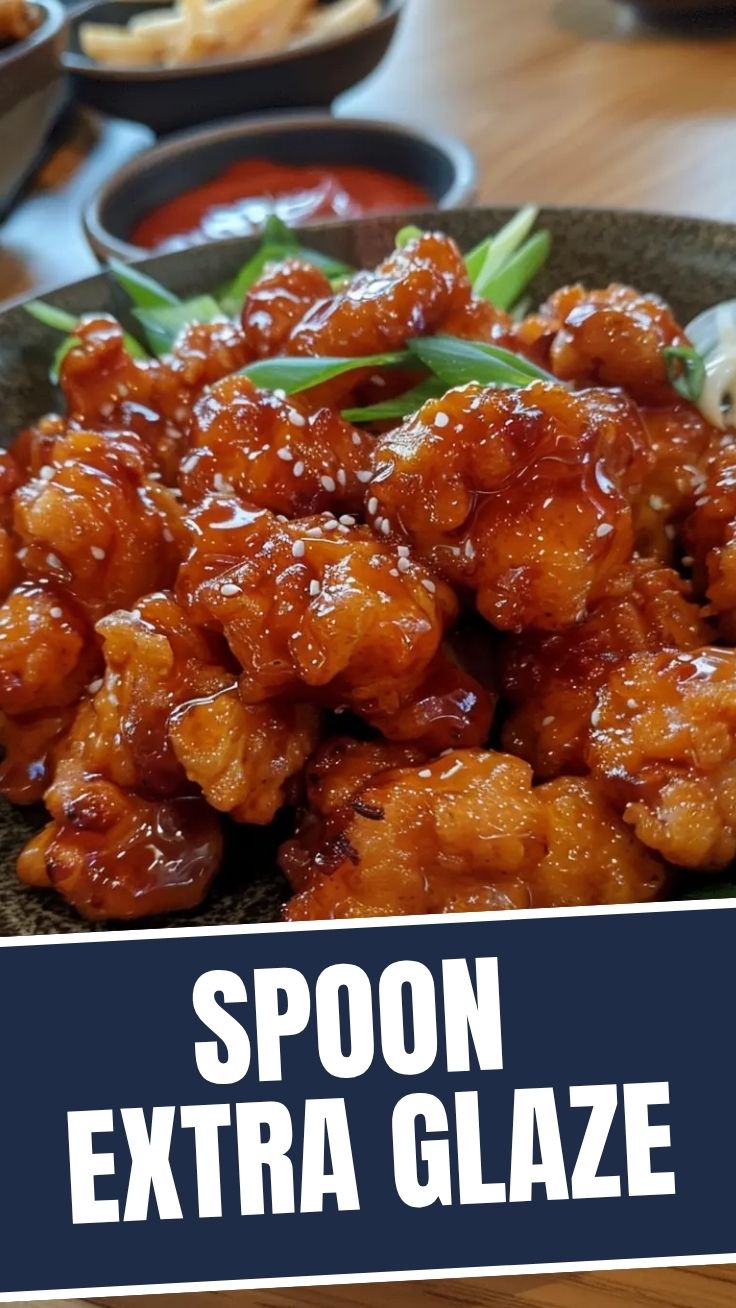
5. Toss and serve: Place fried chicken in a large bowl, pour warm glaze over the top, and toss gently with tongs until every piece is coated. Serve immediately over rice, on a salad, or as the star of a sandwich. If you prefer party appetizers, these same steps work beautifully for Hot Honey Chicken Wings—just increase fry time to 10–12 minutes for larger drumettes.
Nutritional Benefits & Advantages
This dish delivers more than just bold flavor. Chicken thighs provide high-quality protein (about 22 grams per serving) along with iron and zinc for immune support. Honey, while sweet, offers antioxidants and natural antibacterial properties. The moderate use of hot sauce adds capsaicin, which may boost metabolism slightly. By controlling the oil and avoiding deep-fryers at restaurants, you reduce unhealthy trans fats significantly. Pair this chicken with a fresh vegetable side or a light slaw to create a balanced meal that satisfies cravings without derailing your nutrition goals.
Tips Variations & Cooking Advice
– Flavor Twist: Swap honey for maple syrup and add chipotle powder for a smoky-sweet version.
– Dietary Adaptations: Use almond flour and arrowroot powder for a grain-free, keto-friendly coating. Bake at 400°F for 20–25 minutes instead of frying.
– Cooking Method: Air fry at 380°F for 12–15 minutes, shaking halfway, for a lighter crunch.
– Serving Ideas: Drizzle extra glaze over roasted vegetables or turn leftovers into a spicy chicken salad.
– Portion Control: Double the glaze recipe and use half as a dipping sauce to reduce calories while keeping flavor.
Common Mistakes to Avoid
– Skipping the buttermilk soak: Dry, tough chicken is guaranteed without this step. The acidity breaks down proteins and locks in moisture.
– Overcrowding the pan: This crashes oil temperature, resulting in greasy, soft coating. Fry in single layers with space between pieces.
– Glazing too early: If you coat while chicken is piping hot, the glaze runs off. Let it rest 3–5 minutes on the rack first.
– Forgetting the thermometer: Guessing oil temperature leads to burnt exteriors and raw centers. Invest in a $10 thermometer.
– Using cold honey: Straight-from-the-fridge honey seizes up. Warm it slightly before mixing the glaze for smooth consistency.
Storage & Meal Prep Tips
Store leftover hot honey chicken in an airtight container in the refrigerator for up to 4 days. To freeze, place cooled pieces on a baking sheet, freeze until solid (about 2 hours), then transfer to a freezer bag. They keep for 3 months. When reheating, avoid the microwave—it destroys the crunch. Instead, reheat in an air fryer at 375°F for 5–6 minutes or in a 400°F oven for 8–10 minutes. For meal prep, keep the chicken and glaze separate until serving day; combine just before eating to maintain texture.
Conclusion
Mastering this Hot Honey Chicken recipe at home gives you a restaurant-quality dish with complete control over ingredients and spice levels. Whether you serve it over rice, tucked into tacos, or as the centerpiece of a game-day spread, the sweet-and-spicy magic never fails to impress. The same technique works brilliantly for Hot Honey Chicken Wings when you need a crowd-pleasing appetizer. Try this recipe tonight, share your results with friends, and explore other variations on our site. Your new favorite weeknight dinner is just a fry away.
FAQs
1. Can I use boneless chicken breasts instead of thighs?
Yes, but reduce cooking time slightly (4–6 minutes) and check internal temperature earlier. Breasts dry out faster than thighs.
2. How do I make the glaze less spicy?
Cut the hot sauce to 1 tablespoon and omit the red pepper flakes. Add an extra tablespoon of honey to balance heat.
3. Can I bake this instead of frying?
Absolutely. Coat chicken as directed, place on a greased wire rack over a baking sheet, spray with oil, and bake at 400°F for 20–25 minutes, flipping halfway.
4. Why did my breading fall off during frying?
The chicken was likely too wet when you dredged it, or the oil wasn’t hot enough. Let buttermilk drip off thoroughly and maintain 350°F oil.
5. Can I prepare the glaze ahead of time?
Yes, make it up to 3 days in advance and store in the fridge. Reheat gently on the stovetop or microwave in 10-second bursts, stirring between each.
Quick way to grow with Hot Honey Chicken
Ingredients
Equipment
Method
- Pat the chicken thighs dry with paper towels to ensure a crispy skin.
- In a shallow dish, whisk together the flour, paprika, garlic powder, salt, and black pepper.
- Dredge each chicken thigh in the flour mixture, shaking off any excess.
- Heat vegetable oil in a large skillet over medium-high heat.
- Once hot, carefully place the chicken thighs skin-side down in the skillet and cook for 6-8 minutes until golden brown and crispy.
- Flip the chicken and cook for another 5-7 minutes, or until the internal temperature reaches 165°F (74°C).
- Remove the cooked chicken from the skillet and set aside.
- In a small saucepan, combine the honey, hot sauce, apple cider vinegar, and butter.
- Bring the mixture to a simmer over medium heat, stirring until the butter is melted and the sauce is well combined.
- Reduce the heat to low and keep warm.
- Toss the cooked chicken thighs in the hot honey sauce until evenly coated.
- Serve immediately with your favorite sides.