The Ultimate Creamy Dream: How to Master Homemade Baked Mac and Cheese
Ever wondered what makes a truly unforgettable Baked Mac and Cheese? Is it the perfectly al dente macaroni, the rich, velvety cheese sauce, or that golden, bubbly crust straight from the oven? Today, we’re diving deep into the art of crafting this beloved comfort food classic right in your own kitchen. Forget bland, watery versions; we’re talking about a dish so luxurious and satisfying, it’ll instantly become a family favorite. There’s an undeniable magic in combining simple ingredients like pasta and a robust Cheddar cheese into something extraordinary. Mastering homemade mac and cheese not only elevates your cooking but also guarantees a wholesome, customizable meal free from additives – a truly valuable skill for any home cook.
Ingredients & Kitchen Tools
Crafting the perfect mac and cheese requires a thoughtful selection of ingredients and the right culinary tools.
- Elbow Macaroni (1 lb / 450g): The classic choice. Its tubular shape perfectly captures the creamy sauce. You can substitute with other small pasta shapes like cavatappi or shells.
- Butter (1/2 cup / 113g): Unsalted, for making a rich roux and greasing the baking dish. Adds depth of flavor.
- All-Purpose Flour (1/2 cup / 60g): Essential for creating the roux, which thickens the cheese sauce.
- Milk (4 cups / 960ml): Whole milk is recommended for the creamiest result, but 2% can also work. Warm it slightly before adding to prevent lumps.
- Heavy Cream (1 cup / 240ml, optional): For an extra luxurious and decadent sauce.
- Cheddar cheese (4 cups / 450g, shredded): Sharp or extra-sharp for the best flavor payoff. Freshly grated melts smoother than pre-shredded.
- Gruyère or Monterey Jack (2 cups / 225g, shredded): Adds another layer of nutty, melty goodness.
- Dijon Mustard (1 tsp): A secret ingredient that enhances the cheese flavor without overpowering it.
- Nutmeg (1/4 tsp, freshly grated): A pinch makes a world of difference, adding warmth and sophistication.
- Salt (1-2 tsp, to taste): For seasoning the pasta water and the sauce.
- Black Pepper (1/2 tsp, to taste): Freshly ground for best flavor.
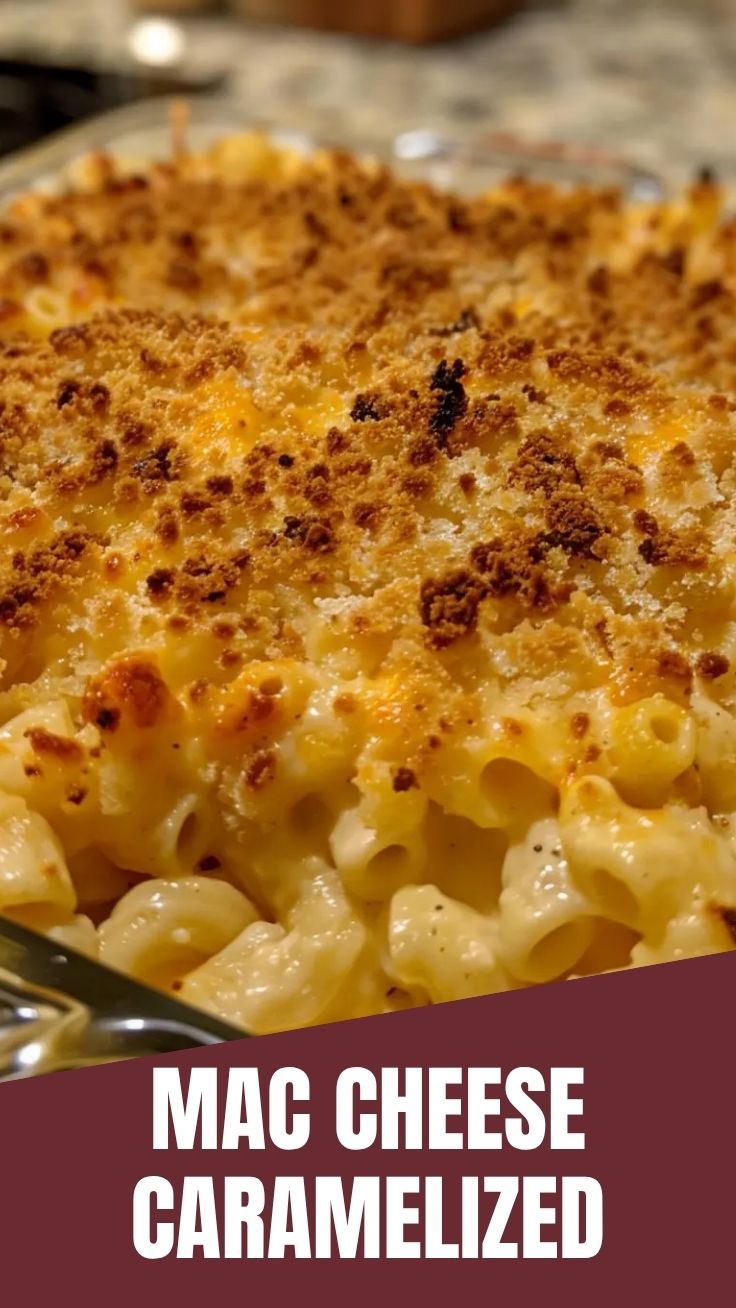
- Panko Breadcrumbs (1 cup / 100g, optional): For a crispy topping. Can substitute with regular breadcrumbs or crushed crackers.
- Paprika (1/2 tsp, optional): For coloring the breadcrumb topping.
- Large Pot/Dutch Oven: For cooking pasta and preparing the cheese sauce.
- Whisk: Essential for making a smooth roux and sauce.
- 9×13 inch Baking Dish: For baking the mac and cheese.
- Box Grater: For grating fresh cheese.
Prep Time & Cooking Schedule
- Prep Time: 20 minutes
- Cook Time: 25-30 minutes (bake time) + 10-12 minutes (pasta cooking)
- Resting Time: 10 minutes (after baking)
This recipe is perfect for a comforting weeknight meal or a celebratory Sunday dinner. You can prepare the cheese sauce and cook the pasta ahead of time, then assemble and bake closer to serving. The resting time is crucial for the sauce to set and prevent it from being too runny.
Step-by-Step Instructions
1. Preheat Oven & Prep Pasta: Preheat your oven to 375°F (190°C). Bring a large pot of salted water to a rolling boil. Add the elbow macaroni and cook according to package directions until al dente – usually 1-2 minutes less than recommended, as it will continue cooking in the oven. Drain well and set aside.
2. Make the Roux: In the same large pot (or a separate Dutch oven), melt the butter over medium heat. Once melted, sprinkle in the flour and whisk continuously for 1-2 minutes until a smooth paste (roux) forms and smells slightly nutty.
3. Build the Sauce Base: Gradually whisk in the warm milk, a little at a time, ensuring no lumps form. Continue whisking until the sauce thickens and begins to simmer, about 5-7 minutes. Stir in the heavy cream if using.
4. Incorporate the Cheese: Remove the pot from the heat. Add the shredded Cheddar cheese, Gruyère (or Monterey Jack), Dijon mustard, nutmeg, salt, and pepper. Stir until all the cheese is completely melted and the sauce is smooth and creamy. Taste and adjust seasoning as needed.
5. Combine & Assemble: Add the drained macaroni to the cheese sauce and stir gently to ensure every piece is coated. Pour the mixture into your greased 9×13 inch baking dish.
6. Add Topping (Optional) & Bake: If desired, combine the panko breadcrumbs with a tablespoon of melted butter and paprika. Sprinkle evenly over the macaroni. Bake for 25-30 minutes, or until the top is golden brown and the sauce is bubbly around the edges. For an extra crispy crust on your Baked Mac and Cheese, you can briefly increase the oven temperature to 400°F (200°C) for the last 5 minutes or use the broiler for 1-2 minutes, watching carefully to prevent burning.
7. Rest & Serve: Let the mac and cheese rest for 10 minutes before serving. This allows the sauce to set and prevents it from being too runny. Serve warm, perhaps with a sprinkle of fresh parsley for color.
Nutritional Benefits & Advantages
While Baked Mac and Cheese is often seen as a comfort food indulgence, it does offer some nutritional benefits. Dairy products like milk and cheese are excellent sources of calcium, vital for bone health, and protein, important for muscle repair and satiety. Pasta provides complex carbohydrates for sustained energy. Using whole wheat pasta increases fiber intake, while incorporating lean proteins like chicken or shrimp can boost the protein content further. Creating it at home gives you complete control over ingredient quality and portion sizes.
Tips, Variations & Cooking Advice
- Cheese Blends: Experiment with other melting cheeses like Fontina, Smoked Gouda, or even a touch of cream cheese for extra creaminess.
- Flavor Boosts: Sautéed onions or garlic, a dash of Worcestershire sauce, or a pinch of cayenne pepper can elevate the flavor profile.
- Protein Power-Up: Stir in cooked chicken, ham, bacon bits, or sautéed shrimp for a more substantial meal.
- Veggie Boost: Add steamed broccoli florets, peas, or spinach during the last step.
- Gluten-Free: Use gluten-free pasta and a GF all-purpose flour blend for the roux.
- Dairy-Free: There are excellent dairy-free cheeses and milks available now. Nutritional yeast can also add a cheesy flavor.
Common Mistakes to Avoid
- Undercooked/Overcooked Pasta: Al dente is key. If it’s too soft before baking, it will turn mushy.
- Lumpy Sauce: Ensure your milk is warm when you add it to the roux, and whisk continuously to prevent lumps.
- Grainy Sauce: This usually happens when cheese is added to a sauce that’s too hot or boiled after cheese is added. Always remove from heat before stirring in cheese.
- Dry Mac and Cheese: Don’t skimp on the sauce! And don’t overbake. The sauce should still be slightly loose when it comes out of the oven, as it will firm up as it rests.
- Too Bland: Don’t forget the salt, pepper, Dijon, and nutmeg! They make a huge difference.
Storage & Meal Prep Tips
Leftover Baked Mac and Cheese can be stored in an airtight container in the refrigerator for up to 3-4 days. To reheat, you can microwave individual portions, adding a splash of milk or cream to loosen the sauce. For larger amounts, reheat in an oven-safe dish at 300°F (150°C) until warmed through, again, adding a little milk if needed to restore creaminess. Freezing is possible, but the texture of the sauce can sometimes become a bit grainy. If freezing, cool completely, then freeze in individual portions for up to 2-3 months. Thaw overnight in the refrigerator before reheating.
Conclusion
Creating the perfect Baked Mac and Cheese at home is a rewarding culinary journey that results in pure comfort food bliss. By following these steps, you’re not just making a meal; you’re crafting an experience – a velvety, cheesy masterpiece that will warm hearts and impress palates. The magic truly happens when quality ingredients like robust Cheddar cheese blend to create something truly exceptional. We encourage you to try this recipe, experiment with your own twists, and share your delicious results. What’s your favorite cheese to add to mac and cheese? Let us know in the comments below!
FAQs
Q1: Can I make the cheese sauce ahead of time?
A1: Yes, you can prepare the cheese sauce up to 2 days in advance. Store it covered in the refrigerator. Reheat gently over low heat, whisking in a splash of milk to loosen, before combining with cooked pasta and baking.
Q2: What’s the best way to prevent the sauce from becoming grainy?
A2: Always remove the sauce from the heat before adding the shredded cheese. Stir until melted, but do not let the sauce boil once the cheese has been incorporated. Using freshly grated cheese also helps tremendously.
Q3: Can I use different types of pasta?
A3: Absolutely! While elbow macaroni is traditional, small to medium pasta shapes like shells, cavatappi, penne, or even rotini work well as they hold the creamy sauce effectively.
Q4: How do I achieve a really crispy topping?
A4: For an extra crispy topping, ensure your breadcrumbs are mixed with a good amount of melted butter. You can also finish under the broiler for 1-2 minutes, watching closely to prevent burning, just after the mac and cheese has finished baking.
Q5: My mac and cheese is a bit dry, what went wrong?
A5: This often happens if the pasta is overcooked before baking, or if the dish is overbaked. Ensure your pasta is al dente, and don’t bake past the point where the sauce is bubbly and the top is golden. Adding a touch more milk or cream to the sauce before baking can also help.

Best way to grow with 3 Baked Mac and Cheese tips
Ingredients
Equipment
Method
- Preheat your oven to 375°F (190°C) and butter a 2-quart baking dish. Cook the elbow macaroni according to package directions until al dente, then drain and set aside.
- In a large saucepan, melt butter over medium heat. Whisk in the flour and cook for one minute, stirring constantly, to create a roux.
- Gradually whisk in the milk until smooth. Bring the mixture to a simmer, stirring, then remove from heat and stir in the shredded cheddar cheese, salt, and pepper until the cheese is fully melted and the sauce is smooth.
- Add the cooked macaroni to the cheese sauce and stir to combine thoroughly. Pour the mixture into the prepared baking dish.
- Bake for 20-25 minutes, or until bubbling and golden brown on top. Let it cool slightly before serving.