
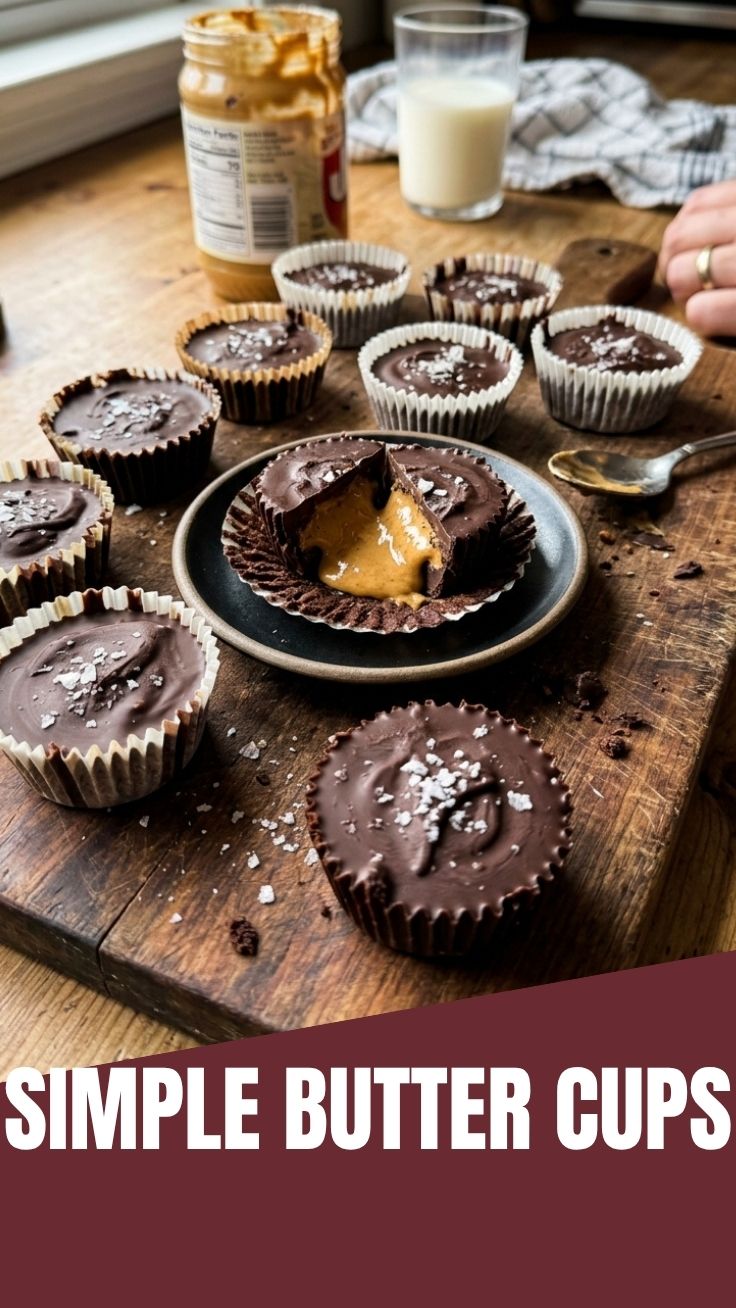
Homemade Chocolate Peanut Butter Cups: The Ultimate Indulgence Made Simple
Have you ever unwrapped a store-bought candy and wished you could control the quality of ingredients while capturing that perfect balance of creamy peanut butter and rich chocolate? I remember the first time I pulled a homemade batch out of the fridge—the glossy chocolate shell cracked with a satisfying snap, revealing a silky peanut center that tasted fresher and more indulgent than anything from a wrapper. Making your own Chocolate Peanut Butter Cups at home isn’t just about saving money; it’s about crafting a treat exactly to your taste, using real ingredients without preservatives or stabilizers. Whether you’re a devoted fan of the classic Reese’s Peanut Butter Cups or simply craving a homemade confection, this recipe delivers foolproof results with minimal fuss.
—
Ingredients & Kitchen Tools
For the Chocolate Coating
– 12 oz high-quality dark chocolate (60–70% cocoa) – Look for couverture or baking chocolate bars; avoid chocolate chips that contain stabilizers, which can affect melting smoothness. Substitution: Use milk chocolate or dairy-free chocolate for a different profile.
– 1 tbsp coconut oil or cocoa butter – Helps thin the chocolate for easier dipping and adds a glossy finish. Optional: Omit if using chocolate with high cocoa butter content.
For the Peanut Butter Filling
– 1 cup creamy peanut butter – Natural, no-stir peanut butter works best; avoid oil-separated varieties unless you stir vigorously. Dairy-free and gluten-free by nature.
– ¼ cup unsalted butter, softened – Adds richness and helps the filling set. Substitution: Use vegan butter or coconut oil for a dairy-free version.
– 1 cup powdered sugar – Provides sweetness and structure. Substitution: Use monk fruit powdered sweetener for a lower-sugar option.
– 1 tsp vanilla extract – Enhances flavor depth.
– Pinch of sea salt – Balances sweetness and accentuates the peanut taste.
Kitchen Tools
– Mini muffin tin – Standard 24‑cup size works best for portion control.
– Double boiler or heatproof bowl over simmering water – For gentle chocolate melting without scorching.
– Small silicone spatula – For spreading filling and coating.
– Toothpicks or small fork – For dipping and removing cups.
– Refrigerator space – Essential for setting layers quickly.
—
Prep Time & Cooking Schedule
– Prep Time: 15 minutes (grate chocolate, soften butter, measure ingredients)
– Cook Time: 5 minutes (melting chocolate)
– Assembly Time: 10 minutes (layering and filling)
– Chilling Time: 30 minutes per layer (total ~1 hour)
– Total Time: Approximately 1 hour 30 minutes
Planning tip: Make these the night before an event. The cups actually improve in texture after 24 hours in the fridge, as the flavors meld and the filling firms perfectly. For best results, avoid rushing the chilling steps—warm filling can cause the chocolate shell to crack.
—
Step-by-Step Instructions
1. Prepare the muffin tin. Line a mini muffin tin with paper liners or lightly grease with coconut oil. Set aside.
2. Melt the chocolate. Chop the chocolate into small, uniform pieces. Place in a heatproof bowl with 1 tbsp coconut oil. Melt over a double boiler, stirring gently until smooth. Remove from heat and let cool slightly for 2 minutes—overheated chocolate can seize. Temperature cue: Chocolate should feel warm but not hot to the touch.
3. Create the chocolate shell. Spoon about 1 tsp of melted chocolate into each liner. Use a small paintbrush or the back of a spoon to coat the bottom and halfway up the sides. Tap the tin gently to release air bubbles. Refrigerate for 10 minutes until firm.
4. Make the peanut butter filling. In a medium bowl, beat softened butter until creamy. Add peanut butter, powdered sugar, vanilla, and salt. Mix until a thick, pliable dough forms. The mixture should hold its shape when pressed—if too dry, add 1 tsp of milk or water.
5. Fill the cups. Roll the peanut butter mixture into small balls (about 1 tsp each) and flatten slightly. Place one disc into each chocolate-lined cup, pressing gently without touching the edges. Leave a tiny gap between the filling and the cup rim to allow the top chocolate layer to seal.
6. Seal the cups. Pour remaining melted chocolate over the filling, spreading to the edges. Tap the tin again to settle. Refrigerate for 30 minutes until fully set.
7. Remove and enjoy. Gently peel off paper liners. Serve immediately or store as directed.
> While you can buy Reese’s Peanut Butter Cups at any store, crafting your own Chocolate Peanut Butter Cups lets you fine-tune sweetness and texture to perfection.
—
Nutritional Benefits & Advantages
Homemade peanut butter cups offer several advantages over processed versions. Peanut butter provides about 8g of plant-based protein per serving, along with heart-healthy monounsaturated fats, magnesium, and vitamin E. Dark chocolate (70% cocoa) contains flavonoids that support cardiovascular health and reduce inflammation. By using real ingredients, you eliminate artificial flavors, hydrogenated oils, and excess sugar—commercial cups often contain up to 40% more sugar per piece. A single homemade cup (using dark chocolate) has roughly 110 calories, 7g fat, 9g carbs, and 3g protein, making it a more mindful indulgence.
—
Tips, Variations & Cooking Advice
– Flavor twist: Add ¼ tsp cinnamon or espresso powder to the chocolate for a mocha-chocolate note.
– Dietary adaptations: Use sun butter or almond butter for a nut-free version; substitute coconut oil for butter in the filling to make it dairy-free.
– Texture boost: Stir 2 tbsp crushed pretzels or toasted coconut into the filling for crunch.
– Portion change: Use a standard muffin tin for jumbo cups—just double the ingredients and increase chilling time to 45 minutes per layer.
– Alternative method: For a no-melt version, press the peanut butter mixture into silicone molds, freeze for 10 minutes, then dip fully in tempered chocolate.
—
Common Mistakes to Avoid
– Seized chocolate – If chocolate becomes grainy or stiff, you overheated it or introduced water. Always use dry utensils and melt gently. Fix: Stir in 1 tbsp vegetable oil to salvage seized chocolate.
– Filling too sticky – Overmixing or using oily peanut butter can cause the filling to stick to hands. Solution: Chill the filling for 15 minutes before rolling.
– Cracked chocolate shell – Adding warm filling to a cold shell causes expansion cracks. Prevention: Let the filling come to room temperature before layering.
– White streaks (bloom) – Rapid temperature changes cause cocoa butter to separate. Prevention: Cool chocolate slowly; avoid refrigerating uncovered cups.
—
Storage & Meal Prep Tips
– Refrigeration: Store in an airtight container for up to 2 weeks. Layer between parchment paper to prevent sticking. The texture remains firm but creamy.
– Freezing: Wrap individually in plastic wrap, then place in a freezer bag. Freeze for up to 3 months. Thaw in the refrigerator overnight—do not microwave, as this ruins the texture.
– Reheating for soft centers: If you prefer a gooey filling, let cups sit at room temperature for 5 minutes before eating. For a firmer snap, serve directly from the fridge.
– Meal prep strategy: Double the batch and freeze half. This recipe scales perfectly, making it ideal for holiday gifting or party planning.
—
Conclusion
Crafting homemade treats isn’t just about the final product—it’s about the satisfaction of controlling every element from ingredient sourcing to sweetness level. These Chocolate Peanut Butter Cups bring the nostalgic joy of a classic candy into your own kitchen with healthier, fresher results. Whether you’re recreating the iconic flavor of Reese’s Peanut Butter Cups or experimenting with your own twist, this recipe delivers consistent, crowd-pleasing outcomes. I encourage you to try a batch this weekend—share your results in the comments, tag a friend who loves chocolate treats, and explore our collection of no‑bake desserts for more inspiration. When you taste that first homemade bite, you’ll never go back to store-bought.
—
FAQs
1. Can I use natural peanut butter (the kind with oil separation)?
Yes, but stir it thoroughly before measuring. Natural peanut butter can make the filling slightly softer, so chill the mixture for 20 minutes before rolling. If still too sticky, add an extra tablespoon of powdered sugar.
2. My chocolate didn’t harden properly—what went wrong?
This usually happens if the chocolate wasn’t tempered, or if humidity is high. Use couverture chocolate (which contains extra cocoa butter) for a snappier set. Alternatively, add 1 tsp of coconut oil to thin the chocolate and help it set faster.
3. How do I make these vegan or dairy-free?
Use dairy-free chocolate (many dark chocolates are naturally vegan), substitute coconut oil or vegan butter for the butter, and ensure your peanut butter contains no added dairy. The recipe is naturally gluten-free.
4. Can I use crunchy peanut butter instead of creamy?
Absolutely! Crunchy adds a delightful texture. Just be aware that the filling may not be as smooth, and the nut pieces can sometimes poke through the chocolate shell—so ensure the filling is firmly packed.
5. Why did my chocolate crack when I cut the cup open?
Cracking occurs if the chocolate layer is too thin or the cup was too cold when cut. Apply slightly more chocolate for the shell (about 2 tsp per layer) and let the cup rest at room temperature for 2 minutes before slicing.