The Ultimate 7-Layer Dip: A Crowd-Pleasing Favorite
Have you ever wondered why certain appetizers vanish within minutes at every gathering? Whether it’s game day, a family reunion, or just a casual taco Tuesday, this 7-Layer Dip consistently steals the show. Preparing it at home isn’t just about saving money—it’s about creating a fresher, more flavorful version than anything store-bought. You control the quality of ingredients, adjust the spice to your liking, and avoid preservatives. Plus, the satisfaction of assembling this vibrant dish yourself adds a special touch. Among classic Mexican appetizers, this dip stands out for its incredible versatility and universal appeal.
—
Ingredients & Kitchen Tools
For the Dip (serves 8–10):
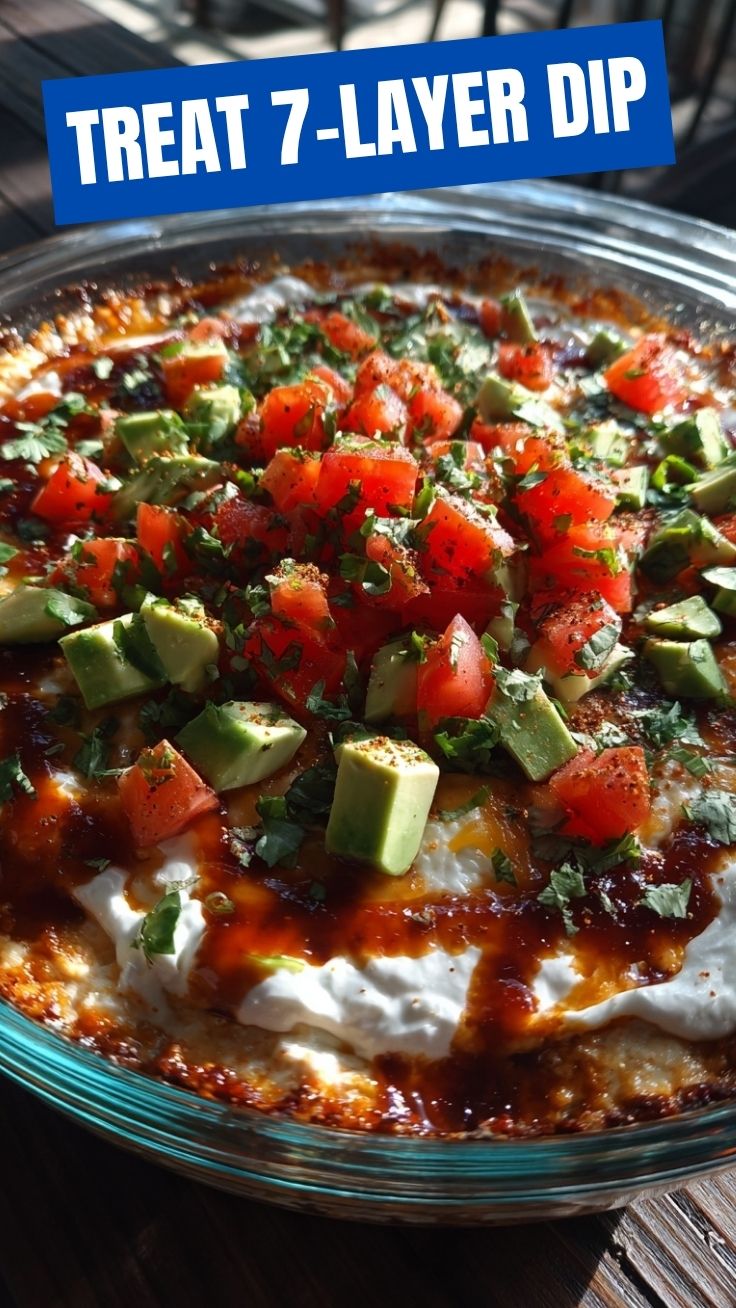
– 1 (16 oz) can refried beans – Use traditional or vegetarian. For a smoother texture, warm slightly before spreading.
– 1 cup sour cream – Full-fat gives best consistency; Greek yogurt works as a lighter swap.
– 1 cup guacamole – Store-bought or homemade. If homemade, add lime juice to prevent browning.
– 1 cup salsa – Choose your heat level. Drain excess liquid to avoid a watery dip.
– 1½ cups shredded Mexican blend cheese – Cheddar, Monterey Jack, or a mix. Freshly shredded melts better.
– ½ cup sliced black olives – Optional but adds briny depth. Omit for a milder flavor.
– ¼ cup chopped green onions – For garnish and fresh bite.
Kitchen Tools:
– 9×13-inch glass or ceramic dish (or deep pie plate)
– Spatula or butter knife for even spreading
– Measuring cups and spoons
– Cutting board and sharp knife
– Mixing bowl (if making guacamole)
Optional Substitutions:
– Dairy-free: Use vegan sour cream, cheese shreds, and guacamole.
– Gluten-free: This recipe is naturally gluten-free—just verify your salsa and beans are certified.
– Protein boost: Add a layer of seasoned ground beef or black beans.
—
Prep Time & Cooking Schedule

– Prep time: 15–20 minutes (mostly chopping and layering)
– Cook time: None (no-bake recipe, but you can warm refried beans if desired)
– Resting time: 30 minutes in the refrigerator to let flavors meld
– Total time: 45 minutes – 1 hour
Plan ahead: The dip can be assembled up to 24 hours in advance. If serving at a party, build it in the morning and refrigerate until guests arrive. This resting period allows the layers to slightly set, making serving cleaner.
—
Step-by-Step Instructions
1. Prepare the base: Spread refried beans evenly across the bottom of your dish. If beans are very thick, warm them in the microwave for 30 seconds for easier spreading.
2. Add sour cream layer: Dollop sour cream over beans and gently spread to the edges. Don’t press too hard—you want distinct layers.
3. Spread guacamole: Carefully spoon guacamole on top, using a small offset spatula to level it. If your guacamole is loose, pat it with paper towels first.
4. Pour salsa: Drain salsa of excess liquid (strain through a sieve if needed), then spoon evenly over guacamole.
5. Sprinkle cheese: Cover the salsa completely with shredded cheese. This creates a barrier that prevents the salsa from seeping into other layers.
6. Add olives and onions: Scatter black olives and green onions on top. For extra crunch, add diced tomatoes or jalapeños.
7. Chill and serve: Cover with plastic wrap and refrigerate at least 30 minutes. Remove 10 minutes before serving. Serve with tortilla chips or fresh veggies.
Texture and temperature tips: For the best experience, serve chilled but not ice-cold. Letting it sit at room temperature for 10 minutes enhances flavor. If you want the cheese slightly melty, broil for 2–3 minutes after adding it (but before adding cold toppings). When serving this classic 7-layer dip alongside other Mexican appetizers, consider offering a variety of scoop-style chips.
—
Nutritional Benefits & Advantages
This colorful dip actually packs surprising nutritional value. Beans provide fiber and plant-based protein, supporting digestion and satiety. Avocado (in guacamole) delivers heart-healthy monounsaturated fats, potassium, and vitamins C, E, and K. Salsa adds lycopene from tomatoes and antioxidants from peppers. Sour cream offers calcium, though you can reduce calories by using light versions.
Compared to fried appetizers, this no-bake dip is lighter and more nutrient-dense. A ¼-cup serving contains roughly 120–150 calories, depending on ingredient choices. For a healthier twist, swap sour cream for plain Greek yogurt (adds protein) and use reduced-fat cheese.
—
Tips Variations & Cooking Advice
– Spice it up: Add a layer of pickled jalapeños or mix chipotle powder into sour cream.
– Make it hearty: Incorporate seasoned ground turkey or beef between beans and sour cream.
– Vegetable swap: Replace refried beans with black bean puree for extra fiber.
– Creative serving: Serve in individual mason jars for portion control or as a dip bar for guests to customize.
– Dairy-free version: Use cashew-based sour cream and vegan cheese shreds.
– Temperature variation: For a warm dip, bake at 350°F for 15 minutes after adding cheese (skip guacamole until after baking).
—
Common Mistakes to Avoid
1. Watery layers: Always drain salsa and pat guacamole if too loose. Excess moisture ruins the structure.
2. Mushed layers: Spread gently—don’t press down. Each layer should remain distinct.
3. Skipping chill time: Without refrigeration, layers blend together and flavors don’t meld.
4. Using pre-shredded cheese: Freshly shredded melts and tastes better. Pre-shredded often contains anti-caking agents.
5. Overloading toppings: Keep layers thin (¼–½ inch each) so every bite includes all components.
—
Storage & Meal Prep Tips
– Refrigerate: Cover tightly with plastic wrap or foil. Stays fresh up to 3 days.
– Freezing: Not recommended—sour cream and guacamole separate upon thawing.
– Reheating: If you made a baked version, reheat portions in the microwave for 30 seconds or oven at 300°F for 10 minutes. Add fresh guacamole after reheating.
– Meal prep: Prepare beans, chop veggies, and shred cheese separately up to 2 days ahead. Assemble day of serving for freshest texture.
—
Conclusion
Mastering this 7-layer dip transforms your appetizer game instantly. Its combination of creamy, spicy, and crunchy elements creates a balanced dish that pleases everyone from picky eaters to adventurous foodies. Whether you’re hosting a super bowl party or a casual dinner, this recipe delivers consistent results. I encourage you to experiment with different salsas, cheeses, or protein additions to make it your own. Share your creation with friends or bring it to your next potluck. And when planning a spread of Mexican appetizers, this dip pairs beautifully with mini tacos or quesadillas. Dive in and enjoy every layer!
—
FAQs
Q: Can I make this dip ahead of time?
A: Absolutely. Assemble up to 24 hours in advance, cover, and refrigerate. Add fresh toppings like green onions just before serving for best appearance.
Q: How do I prevent guacamole from browning?
A: Spread guacamole as the third layer (after beans and sour cream) so the salsa above creates a seal. Or press plastic wrap directly onto the guacamole before adding salsa.
Q: What’s the best salsa to use?
A: A thick restaurant-style salsa works best. Avoid chunky salsas with large pieces—they make layering uneven. Drain well before adding.
Q: Can I make this gluten-free?
A: Yes, this recipe is naturally gluten-free. Just double-check that your refried beans, salsa, and spice blends don’t contain wheat-based additives.
Q: How do I make it spicier without changing texture?
A: Mix ½ teaspoon cayenne or chipotle powder into the sour cream. Or add a layer of diced jalapeños between salsa and cheese.
Q: Why did my dip turn watery after refrigeration?
A: Likely cause: undrained salsa or loose guacamole. Always strain salsa and pat guacamole with paper towels if it seems runny. Also, avoid overmixing layers.
How to Grow the Best 7-Layer Dip
Ingredients
Equipment
Method
- Spread refried beans evenly as the first layer in a large serving dish.
- Carefully spoon guacamole over the bean layer, spreading it gently to form the second layer.
- Spread sour cream over the guacamole, creating a smooth third layer.
- Pour salsa over the sour cream, distributing it evenly as the fourth layer.
- Sprinkle shredded cheese generously over the salsa to form the fifth layer.
- Scatter chopped tomatoes over the cheese for the sixth layer.
- Arrange sliced black olives as the final, seventh layer on top.