The Ultimate Guide to Perfect Blackened Chicken at Home
Have you ever wondered why restaurant-quality Blackened Chicken is so hard to replicate in your own kitchen? The secret isn’t just heat—it’s the perfect balance of spice, technique, and timing. Making this bold, smoky dish at home not only saves money but lets you control the heat level and freshness of every ingredient. Whether you’re a seasoned cook or a beginner, mastering Blackened Seasoning and the searing process will transform your weeknight dinners into something spectacular. Let’s dive into the science and art of this iconic dish.
Ingredients & Kitchen Tools
For the Blackened Chicken
– 4 boneless, skinless chicken breasts (about 6 oz each) – Butterfly or pound to even thickness for consistent cooking.
– 3 tablespoons blackened seasoning (store-bought or homemade – see below) – The star of the show; adjust cayenne for heat preference.
– 2 tablespoons unsalted butter – Butter adds richness and helps the seasoning stick; use ghee for dairy-free.
– 1 tablespoon avocado oil – High smoke point oil prevents burning; can substitute grapeseed or refined coconut oil.
For the Blackened Seasoning (makes ¼ cup)
– 1 tablespoon smoked paprika – For deep color and smokiness.
– 2 teaspoons garlic powder
– 2 teaspoons onion powder
– 1 teaspoon cayenne pepper – Reduce to ½ tsp for mild, increase to 1½ tsp for spicy.
– 1 teaspoon dried thyme
– 1 teaspoon dried oregano
– 1 teaspoon black pepper
– ½ teaspoon salt – Fine sea salt distributes evenly.
Kitchen Tools
– Cast-iron skillet (best for high heat), meat mallet, paper towels, instant-read thermometer, tongs, and a plate for resting.
Prep Time & Cooking Schedule

– Prep time: 10 minutes (pound chicken, mix seasoning, pat dry).
– Resting time: 15 minutes at room temperature after seasoning.
– Cook time: 6–8 minutes total.
– Total time: ~30 minutes.
Plan to serve immediately after cooking for the best crust. Resting the chicken 5 minutes after searing is optional but helps retain juices.
Step-by-Step Instructions
1. Preheat your cast-iron skillet over medium-high heat for 5 minutes. You want it screaming hot—water droplets should sizzle instantly. Meanwhile, pat the chicken breasts dry with paper towels. Moisture is the enemy of a good crust.
2. Season generously with the blackened seasoning. Sprinkle both sides, then gently press the seasoning into the meat. Let it sit at room temperature for 15 minutes. This allows the flavors to penetrate and the surface to dry further. Remember, Blackened Chicken relies on a dry surface to sear properly.
3. Add oil and butter to the hot skillet. Swirl to coat. Carefully place the chicken breasts in the pan—you should hear a vigorous sizzle. Cook for 3–4 minutes without moving them. The crust will form naturally. Flip using tongs, then cook another 3–4 minutes until internal temperature reaches 160°F (carryover cooking will bring it to 165°F).
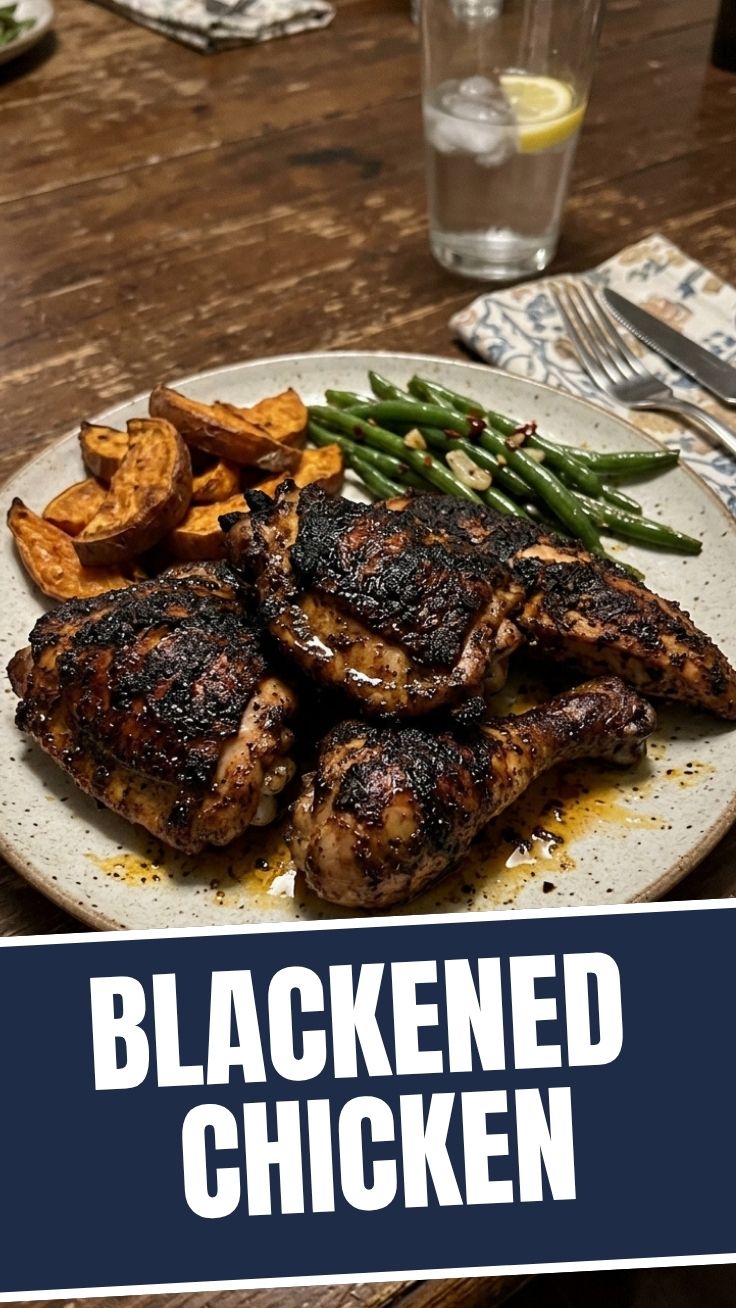
4. Remove and rest for 5 minutes before slicing. For extra depth, deglaze the pan with a splash of chicken broth or lemon juice after removing the chicken—this makes a quick pan sauce. The bold Blackened Seasoning delivers a spicy, smoky punch that pairs beautifully with creamy sides like mashed potatoes or a cool cucumber salad.
Pro tip: If your seasoning begins to burn (too dark/smoke), lower the heat slightly next time. Your goal is a dark, charred crust—not burnt bitterness.
Nutritional Benefits & Advantages
Blackened chicken is naturally high in protein (about 35g per serving) and low in carbs, making it ideal for keto and low-carb diets. The spices in Blackened Seasoning—paprika, cayenne, garlic—are rich in antioxidants like capsaicin (boosts metabolism) and allicin (supports immunity). Cooking with butter adds fat-soluble vitamins A and D, while avocado oil provides heart-healthy monounsaturated fats. Compared to fried chicken, this method uses minimal oil and no breading, saving about 100–150 calories per serving. It’s a gluten-free, dairy-friendly (if using ghee) meal that fits paleo, Whole30, and Mediterranean diets.
Tips, Variations & Cooking Advice
– Flavor twist: Add 1 teaspoon of brown sugar to the seasoning for a sweet-savory crust.
– Protein swap: Use the same technique on salmon, shrimp, or pork chops. Adjust cook time accordingly.
– Dietary adaptation: Use ghee or coconut oil for dairy-free; double-check seasoning blend for gluten (most are gluten-free, but always verify).
– Cooking method alternative: For less smoke, sear in a non-stick pan over medium-high heat. You’ll get a good crust but less char.
– Portion change: For meal prep, slice chicken after cooking and toss with greens for salads all week.
Common Mistakes to Avoid
– Mistake #1: Not patting chicken dry. Moisture creates steam, preventing a crisp crust. Solution: Use paper towels and let air-dry 10 minutes.
– Mistake #2: Overcrowding the skillet. Too much chicken lowers pan temperature, causing steaming. Cook in batches if needed.
– Mistake #3: Moving the chicken too early. Let it sear undisturbed for 3 minutes. If it sticks, it’s not ready to flip.
– Mistake #4: Burning the seasoning. If your kitchen fills with acrid smoke, your pan is too hot or you used too much oil. Lower heat slightly and wipe pan between batches.
– Mistake #5: Skipping the rest time after seasoning. Room-temperature chicken cooks more evenly. Cold meat will seize up and toughen.
Storage & Meal Prep Tips
Store leftover blackened chicken in an airtight container in the refrigerator for up to 4 days. To freeze, wrap each piece tightly in plastic wrap then foil, or place in a freezer-safe bag for up to 3 months. Thaw overnight in the fridge.
Reheating: The crust is best restored in a dry skillet over medium heat for 2 minutes per side. Avoid microwaving—it will steam and ruin the texture. For quick reheating, slice thinly and warm in a hot oven at 375°F for 5 minutes. Never reheat twice; portion only what you’ll eat.
Conclusion
Mastering this Blackened Chicken recipe unlocks a world of bold, smoky flavor without the restaurant price tag. The key takeaway: heat management and a dry surface are everything. When you pair the intense crust of Blackened Seasoning with a simple side, dinner becomes an event. Try it tonight, snap a photo, and share your results—or explore our other one-skillet wonders for more weeknight inspiration. Your taste buds will thank you.
FAQs
1. Can I use pre-made blackened seasoning instead of homemade?
Yes, store-bought blends work well. Just check sodium levels and adjust salt accordingly. Our homemade version gives you full control over heat and freshness.
2. Why did my chicken turn out dry?
Most likely you overcooked it. Use an instant-read thermometer and pull the chicken at 160°F. Also, pounding to even thickness helps prevent thin edges from drying out.
3. Can I make this recipe without a cast-iron skillet?
Absolutely. A heavy stainless steel or non-stick skillet works, but cast iron retains heat best for that deep char. Avoid thin pans that cause temperature drops.
4. How do I reduce the spiciness?
Cut the cayenne pepper in half, or substitute with ancho chili powder for mild heat. You can also serve with a yogurt or sour cream dipping sauce to balance the fire.
5. Can I grill blackened chicken instead?
Yes! Preheat a gas or charcoal grill to medium-high. Oil the grates, then sear for 4–5 minutes per side. The smoky flavor from charcoal enhances the blackening even more.
Quick way to grow: 3 Blackened Chicken
Ingredients
Equipment
Method
- Pat the chicken breasts dry with paper towels to ensure a crispy crust.
- In a small bowl, combine paprika, garlic powder, onion powder, dried thyme, cayenne pepper, salt, and black pepper to create the blackening seasoning.
- Rub the seasoning mixture generously all over both sides of each chicken breast.
- Heat olive oil in a large cast-iron skillet or heavy-bottomed pan over medium-high heat until shimmering.
- Carefully place the seasoned chicken breasts in the hot skillet, ensuring not to overcrowd the pan.
- Cook for 4-6 minutes per side, or until a dark, crusty sear forms and the internal temperature reaches 165°F (74°C).
- Remove chicken from the skillet and let it rest on a cutting board for 5 minutes before slicing.
- Slice the blackened chicken breasts and serve immediately with your favorite sides like rice, vegetables, or a fresh salad.