The Ultimate Guide to Authentic Texas Beef Chili: A Bold, Smoky Bowl of Comfort
Have you ever stood in the chili aisle, staring at cans, wondering why homemade never tastes like that legendary bowl from the roadside diner? The secret isn’t in a can—it’s in the patient layering of dried chiles, seared beef, and slow-simmered spice. Preparing a proper bowl of Texas Beef Chili at home transforms your kitchen into a smoke-filled sanctuary. You control the heat, the richness, and the texture. This isn’t a weeknight hack; it’s a weekend ritual that rewards you with deep, complex flavor. Homemade Chili con carne saves you money, avoids preservatives, and lets you customize every layer. Get ready to unlock a chili that rivals any Texas roadhouse.
Ingredients & Kitchen Tools
Core Ingredients
– 2 lbs beef chuck – Cut into ½-inch cubes; marbling equals flavor. Substitute with brisket or short rib for extra richness.
– 3 dried ancho chiles – Stemmed and seeded; adds smoky sweetness. Guajillo works as a substitute.
– 2 dried pasilla chiles – Brings earthy depth; use morita for smokier heat.
– 1 large yellow onion – Diced; builds the aromatic base.
– 4 cloves garlic – Minced; fresh only, no pre-jarred.
– 2 tbsp tomato paste – Deepens color and umami.
– 1 can (14.5 oz) fire-roasted diced tomatoes – Adds acidity and body.
– 2 cups beef broth – Low-sodium preferred; adjust salt later.
– 2 tbsp chili powder – Use a blend without cumin if your spices cover it.
– 1 tbsp ground cumin – Toasted freshly yields better aroma.
– 1 tsp smoked paprika – Enhances the campfire note.
– 1 tsp dried oregano – Mexican oregano preferred.
– Salt and black pepper – To taste.
– 2 tbsp bacon fat or vegetable oil – For searing; bacon fat adds smoky depth.
Kitchen Tools
– Heavy-bottomed Dutch oven – Enameled cast iron retains heat perfectly.
– Sharp chef’s knife – Clean cuts, not ragged tears.
– Cutting board – Dedicated for meat and veg prep.
– Wooden spoon or spatula – For scraping fond without scratching.
– Small bowl – For rehydrating chiles.
– Immersion blender or blender – For puréeing soaked chiles.
– Measuring spoons – Accuracy matters in balancing spice.
Optional Substitutions
– Replace beef chuck with ground beef (80/20) for a quicker, chunk-free chili.
– Swap beef broth with dark beer (stout) for malty richness.
– No dried chiles? Use ¼ cup quality chili powder plus 1 tsp chipotle powder.
Prep Time & Cooking Schedule

| Stage | Time | Notes |
|——-|——|——-|
| Prep chiles | 15 min | Stem, seed, toast, and soak dried chiles. |
| Prep beef | 10 min | Trim excess fat, cut into cubes, season. |
| Searing | 10 min | Work in batches; don’t crowd the pot. |
| Cooking | 2–2.5 hours | Simmer until beef is fork-tender. |
| Resting | 30 min | Off heat, lid on; flavors meld beautifully. |
| Total | ~3 hours | Plan for a lazy afternoon session. |
Context for planning: Start by 3 PM for a 6 PM dinner. The chili tastes even better next day—perfect for make-ahead Sunday meal prep. The active hands-on time is only about 35 minutes; the rest is gentle bubbling.
Step-by-Step Instructions
1. Rehydrate the chiles. Place dried anchos and pasillas in a dry skillet over medium heat. Toast 30–45 seconds per side until fragrant but not burned. Transfer to a heatproof bowl, cover with boiling water, and soak 15 minutes. Drain, reserve ½ cup soaking liquid.
2. Purée the chile paste. Blend soaked chiles with reserved liquid until smooth. Strain through a fine-mesh sieve to remove any stubborn skins. Set aside.
3. Sear the beef. Pat beef cubes dry with paper towels. Season generously with salt and pepper. Heat Dutch oven over medium-high heat. Add bacon fat or oil. Sear beef in batches, browning all sides (about 3–4 minutes per batch). Transfer to a plate.
4. Sauté the aromatics. Reduce heat to medium. Add diced onion; cook until soft and translucent (about 5 minutes). Add garlic; cook 1 minute more. Stir in tomato paste; cook 1 minute until darkened.
5. Build the spice base. Add chili powder, cumin, smoked paprika, and oregano. Stir constantly for 30 seconds until fragrant. Pour in a splash of beef broth to deglaze the pan, scraping up browned bits.
6. Combine and simmer. Return beef to the pot. Add chile purée, diced tomatoes, remaining beef broth, and reserved chile soaking liquid. Bring to a gentle boil, then reduce heat to low. Cover with lid slightly ajar. Simmer 2–2.5 hours, stirring occasionally, until beef is tender and sauce has thickened.
Practical tip for texture: For a thicker chili, remove lid during the last 30 minutes to allow moisture to evaporate. For a looser sauce, add more broth or beer as it cooks. This authentic Texas Beef Chili develops complexity as it rests. Also known as Chili con carne, this version relies solely on beef and chiles—no beans allowed in the Lone Star State.
7. Adjust seasoning. Taste before serving. Add salt gradually—beef and tomatoes often need a final boost. If chili is too acidic, stir in ½ teaspoon sugar or a splash of apple cider vinegar for balance.
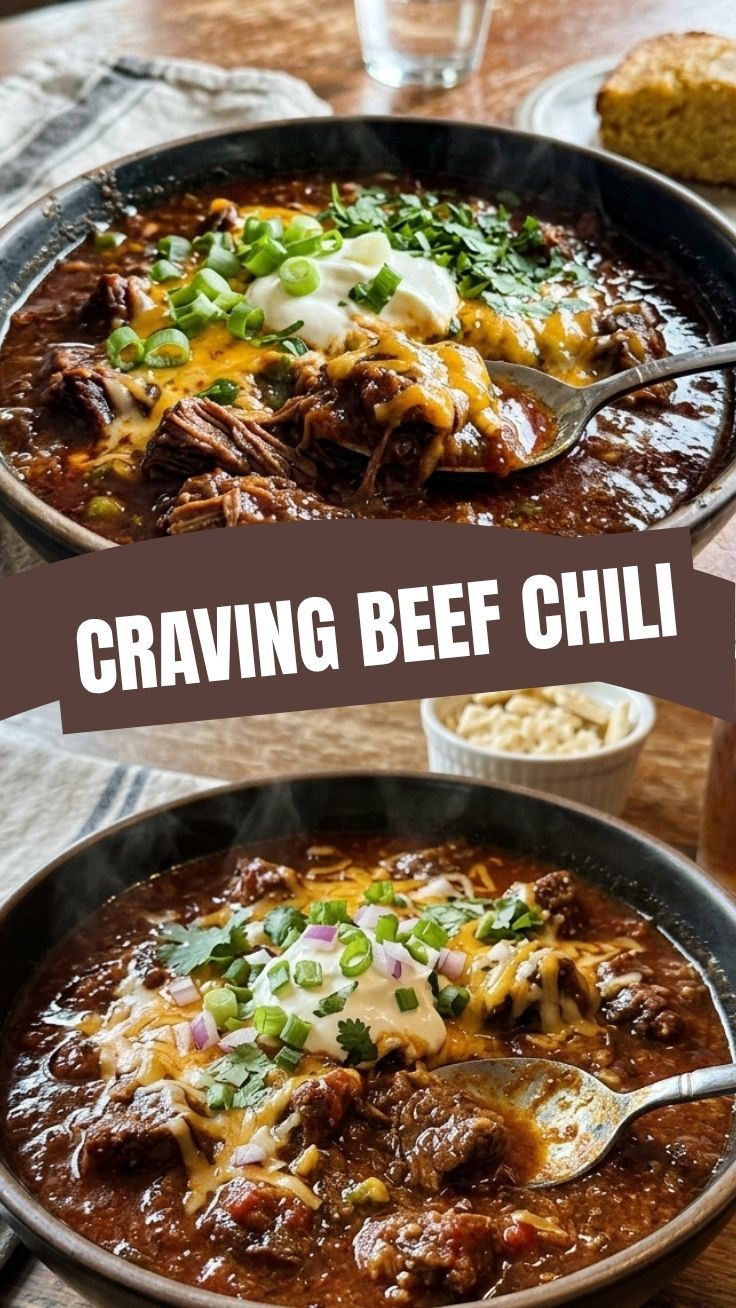
8. Rest and serve. Turn off heat, cover, and let chili rest 30 minutes. This step allows flavors to marry. Serve with optional toppings: shredded sharp cheddar, diced white onion, fresh cilantro, and warm cornbread.
Nutritional Benefits & Advantages
Texas Beef Chili delivers surprising nutritional value beyond its bold flavor. Beef chuck provides high-quality protein (about 25g per serving) and essential iron for energy and oxygen transport. Dried ancho chiles are rich in vitamin A (beta-carotene) and capsaicin, which may boost metabolism and reduce inflammation. Garlic and onions contribute prebiotic fibers that support gut health. Cumin aids digestion and adds antioxidants. When served with beans (if you go non-Texan), fiber content increases significantly. This dish is naturally gluten-free and, using beef only, fits keto-friendly macro targets.
Tips, Variations & Cooking Advice
Flavor variations:
– Smokier version: Replace pasilla with chipotle peppers in adobo (2–3 peppers, minced).
– Dark beer chili: Swap 1 cup broth with stout or porter for roasted malt notes.
– Spicy kick: Add 1 minced jalapeño with the onions, or cayenne to taste.
Alternative cooking methods:
– Slow cooker: After searing beef, transfer everything to a slow cooker. Cook low 6–8 hours or high 4–5 hours.
– Instant Pot: Use sauté function for searing, then pressure cook high 30 minutes with natural release.
Dietary adaptations:
– Gluten-free: Use tamari instead of Worcestershire (if added). Ensure chili powder is pure (no fillers).
– Dairy-free: Skip cheese topping; use avocado for creaminess.
Portion adjustments: This recipe serves 6–8. Double easily but be warned: chili freezes beautifully for months.
Common Mistakes to Avoid
1. Skipping the sear. Browning beef builds the entire flavor foundation. No shortcut substitutes for the Maillard reaction.
2. Using pre-ground beef without browning properly. Ground beef releases water; drain excess fat to avoid greasy chili.
3. Overcrowding the pan. Steaming instead of searing prevents crust formation. Sear in batches.
4. Adding too much liquid early. Chili should be thick; dilute only if it reduces too much during simmering.
5. Tasting too early. Acid and spice mellow over time. Judge final seasoning after at least 1.5 hours of cooking.
6. Adding beans. In Texas, chili is beef and chiles—nothing else. If you must, serve beans on the side.
Storage & Meal Prep Tips
Cooling: Transfer chili to shallow containers to cool quickly (within 2 hours) before refrigerating.
Refrigeration: Store in airtight containers up to 4 days. Flavor actually improves on day 2–3.
Freezing: Portion into freezer-safe bags or containers. Remove as much air as possible. The chili keeps 3–4 months. Thaw overnight in refrigerator.
Reheating: Warm gently in a saucepan over medium-low heat, stirring occasionally. Add a splash of broth or water if too thick. For microwave, use 50% power and stir every minute to prevent hotspots. Avoid boiling, which can toughen the beef fibers.
Meal prep tip: Cook a double batch on Sunday. Portion into single servings for quick lunches or busy weeknight dinners. Chili also works as a filling for tacos, stuffed peppers, or nachos.
Conclusion
Whether you call it Texas Beef Chili or Chili con carne, this recipe delivers a bowl of pure comfort—rich, smoky, and deeply satisfying. The patient process of toasting chiles, searing beef, and slow-simmering rewards you with layers of flavor no store-bought version can touch. You’ve learned how to balance heat, adjust texture, and avoid common pitfalls. Now it’s your turn. Fire up that Dutch oven, invite some friends, and let them taste the difference homemade makes. Share your results in the comments—did you add beans, a secret spice, or an unexpected topping? Explore our other beef-centric recipes for more smoky slow-cooked adventures.
FAQs
1. Can I use ground beef instead of chuck?
Yes. Use 80/20 ground beef. Brown it in batches, drain excess fat, and proceed with the recipe. The texture will be finer but still delicious.
2. How do I fix chili that’s too spicy?
Stir in a tablespoon of sour cream, cream cheese, or yogurt before serving. Sugar (1 tsp) also balances heat. Adding more beef broth dilutes spiciness but may thin the chili.
3. Why is my chili bitter?
Bitter chili usually means burned chiles or garlic. Toast dried chiles carefully—just until fragrant. Garlic should be added after onions and cooked only 1 minute.
4. Can I make this chili vegetarian?
This recipe relies on beef for structure. For a red chili, substitute with portobello mushrooms, butternut squash, and kidney beans. You’ll need to adjust seasoning significantly.
5. How long should chili simmer?
Minimum 2 hours for chuck to become tender. Up to 3 hours is ideal. Longer simmering develops depth but watch liquid levels—add broth as needed to prevent burning.
6. Do I have to remove chili seeds?
Yes. Dried chile seeds add unpredictable heat and a gritty texture. Always stem and seed before toasting. For extra spice, include one seeded chipotle with the liquid.